Genesis Beginner

Monday, February 13, 2017

Genesis Widgetized Archive - Plugin Review
The Genesis Widgetized Archive plugin is a nifty little helper tool from David Decker which assists you in creating a personalized archive page for your Genesis powered website.
The Genesis framework itself comes with an archive page template file named page_archive.php which displays the following:
  • a list of your site’s pages
  • category list
  • author list
  • a monthly archive list
  • and a list of 100 of your recent posts
One way to alter this behaviour is to add your own page_archive.php file to your child theme and modify it as you see fit. Another way, my preferred method, is to use the Genesis Widgetized Archive plugin.
You install the plugin the same way you install any plugin – by searching for it while in the Add Plugins screen then clicking install or by downloading it to your hard drive and then uploading to your site.
Once activated, the plugin adds 3 new widget areas called Archive Page Template #1, Archive Page Template #2 and Archive Page Template #3 as seen in the image below.

To start using it, publish a blank page and apply the Archive Page template to it. Next, go to your Widgets screen and start adding widgets. It’s as easy as that!
Aside from the fact that adding content is as simple as adding a widget, what I really like about this plugin is that it displays your content in columns rather than having a potentially huge list running the length of the page. For instance, if you insert 5 widgets into the Archive Page Template #1 widget area it will display the content of all 5 widgets in a single column. However, if you insert 5 widgets into the Archive Page Template #1 widget area and another 5 into the Archive Page Template #2 widget area the content will be split into 2 columns. If you then place an additional number of widgets into the Archive Page Template #3 widget area the content will be split into 3 columns.
Here on this very site I use a Pages widget in the Archive Page Template #1 widget area and in the Archive Page Template #2 widget area I use both a Categories and Archives widget as seen in the image below.

And this is the result …

You can see it in action live by clicking the Archive link in the menu at the top of the page.
As you can see, the content is shown in a neat and compact manner. And in case you’re wondering, yes the columns are responsive.
Because content is added to the archive page via widgets, you can add practically anything you want. Add a pages widget, multiple text widgets, a search form – whatever. You’re limited only by your imagination.
The plugin comes with some very basic CSS. Any additional style requirements should be done via your child theme. I like this plugin so much that all of the free child themes offered here on WPCanada come with appropriate styles ensuring complete compatibility. For more in-depth customization the plugin also comes with 2 action hooks and 6 filters – check the plugin documentation to see exactly what you can do.
If you’re a Genesis fan and use it on your own site be sure to give this plugin a go. You’ll love it.
Malcolm Genesis Child Theme
Here you can download the Malcolm theme. This is a FREE child theme for the Genesis framework. Malcolm requires Genesis 2.0+ and WordPress 4.0+ in order to run. Genesis not included.

Standard Genesis Features

  • Built-in support for HTML5 & schema.org markup
  • 6 different layouts
  • custom logo
  • custom background
  • custom widgets
  • feature images
  • 4 content column classes
  • intuitive theme panel
  • powerful SEO options – no need for plugins

Malcolm Theme Features

  • HTML5-ready
  • Google fonts
  • Integrated Dashicons for displaying .entry-meta items
  • Integrated Genericons for displaying custom links in primary nav
  • primary navigation fixed to the top of the page
  • Tertiary Navigation Menu
  • new widget page template
  • new landing page template
  • new responsive menus
  • 8 different custom content box styles to choose from
  • Gradient buttons. 11 styles to choose from
  • support for the Genesis Responsive Slider plugin [link]
  • support for the Genesis eNews Extended plugin [link]
  • support for the Genesis Widgetized Not Found & 404 plugin [link]
  • support for the Genesis Widgetized Archive plugin [link]
  • single post navigation
  • custom front page that features 9 custom widget areas
  • custom widget area that appears both before and after posts on single post pages
  • responsive layout
  • internationalized – ready for translation

License

Malcolm is released under the GPL License.

Support

Support is limited to helping you get your theme up and running just like you see on the demo site. Support does not include customizations.
Marcus Genesis Child Theme
Here you can download the Marcus theme. This is a FREE child theme for the Genesis framework. Marcus requires Genesis 2.0+ and WordPress 4.0+ in order to run. Genesis not included.


Standard Genesis Features

  • Built-in support for HTML5 & schema.org markup
  • 6 different layouts
  • custom logo
  • custom background
  • custom widgets
  • feature images
  • 4 content column classes
  • intuitive theme panel
  • powerful SEO options – no need for plugins

Marcus Theme Features

  • HTML5-ready
  • Google fonts
  • Integrated Dashicons for displaying .entry-meta items
  • Integrated Genericons for displaying custom links in primary nav
  • primary navigation fixed to the top of the page
  • Tertiary Navigation Menu
  • new widget page template
  • new landing page template
  • new responsive menus
  • 8 different custom content box styles to choose from
  • Gradient buttons. 11 styles to choose from
  • support for the Genesis Responsive Slider plugin [link]
  • support for the Genesis eNews Extended plugin [link]
  • support for the Genesis Widgetized Not Found & 404 plugin [link]
  • support for the Genesis Widgetized Archive plugin [link]
  • single post navigation
  • custom front page that features 9 custom widget areas
  • custom widget area that appears both before and after posts on single post pages
  • responsive layout
  • internationalized – ready for translation

License

Marcus is released under the GPL License.

Support

Support is limited to helping you get your theme up and running just like you see on the demo site. Support does not include customizations.

Sunday, February 12, 2017

Sidney Genesis Child Theme
Here you can download the Sidney theme. This is a FREE child theme for the Genesis framework. Sidney requires Genesis 2.0+ and WordPress 4.0+ in order to run. Genesis not included.

Standard Genesis Features

  • Built-in support for HTML5 & schema.org markup
  • 6 different layouts
  • custom logo
  • custom background
  • custom widgets
  • feature images
  • 4 content column classes
  • intuitive theme panel
  • powerful SEO options – no need for plugins

Sidney Theme Features

  • HTML5-ready
  • Google fonts
  • Integrated Dashicons for displaying .entry-meta items
  • Integrated Genericons for displaying custom links in primary nav
  • new responsive menus
  • tertiary menu which appears above footer widgets
  • Widget Page template
  • Landing Page template
  • 8 different custom content box styles to choose from
  • Gradient buttons. 11 styles to choose from
  • support for the Genesis eNews Extended plugin [link]
  • support for the Genesis Widgetized Not Found & 404 plugin [link]
  • support for the Genesis Widgetized Archive plugin [link]
  • single post navigation
  • 3 custom widget areas
  • responsive layout
  • internationalized – ready for translation

License

Sidney is released under the GPL License.

Support

Support is limited to helping you get your theme up and running just like you see on the demo site. Support does not include customizations.

Winfield Genesis Child Theme
Here you can download the Winfield theme. This is a FREE child theme for the Genesis framework. Winfield requires Genesis 2.0+ and WordPress 4.0+ in order to run. Genesis not included.

Standard Genesis Features

  • Built-in support for HTML5 & schema.org markup
  • 6 different layouts
  • custom header
  • custom background
  • custom widgets
  • feature images
  • 4 content column classes
  • intuitive theme panel
  • powerful SEO options – no need for plugins

Winfield Theme Features

  • HTML5-ready
  • Google fonts
  • Genericons support for custom primary navigation links
  • 8 different content box styles to choose from
  • 11 different gradient buttons
  • Author label that appears when post author comments on a post he wrote
  • front page template with 6 custom widget areas that reverts to a standard blog format if no widgets active
  • 2 additional widget areas, Before Entry and After Entry
  • widget Page Template
  • landing Page Template
  • single post navigation
  • 3 menu locations – Primary, Secondary and Tertiary
  • support for the Genesis Responsive Slider plugin [link]
  • support for the Genesis eNews Extended plugin [link]
  • support for the Genesis Widgetized Not Found & 404 plugin [link]
  • support for the Genesis Widgetized Archive plugin [link]
  • responsive layout
  • internationalized – ready for translation
  • and more

License

Winfield is released under the GPL License.

Support

Support is limited to helping you get your theme up and running just like you see on the demo site. Support does not include customizations.


Use Custom Domains With Xampp
A few day's ago I published a tutorial on how to install both WordPress and XAMPP on your Windows PC. That article is here.
Anyway, if you’re familiar with working with XAMPP you know that the URLs to your various web projects look something like this … http://localhost/yoursite
Did you know that you can set up custom domains on your PC so that those URLs will look something like this … http://yoursite.dev
The process is very easy and includes modifying just 2 files: the Windows Hosts file and an Apache configuration file.

Windows Hosts File

The Windows Hosts file is simply a plain text file that maps hostnames to IP addresses. In Windows 8.1 it is located at C:\Windows\System32\Drivers\etc By modifying this file we can tell our PC not to go out on to the internet to look for a particular domain but to look for it on the computer itself.
Here is what an untouched Windows Hosts file looks like …
# Copyright (c) 1993-2006 Microsoft Corp.
#
# This is a sample HOSTS file used by Microsoft TCP/IP for Windows.
#
# This file contains the mappings of IP addresses to host names. Each
# entry should be kept on an individual line. The IP address should
# be placed in the first column followed by the corresponding host name.
# The IP address and the host name should be separated by at least one
# space.
#
# Additionally, comments (such as these) may be inserted on individual
# lines or following the machine name denoted by a '#' symbol.
#
# For example:
#
#      102.54.94.97     rhino.acme.com          # source server
#       38.25.63.10     x.acme.com              # x client host

# localhost name resolution is handle within DNS itself.
#       127.0.0.1       localhost
#       ::1             localhost
What we are going to do is add an entry to this file so that we can map our custom domain to the IP address 127.0.0.1 which is each computer’s loopback address. This is a special IP address reserved for use on each PC.
Important note: please make a backup of your Hosts file first.
Windows 8.1 and Windows 7 includes something called User Account Control (UAC) which prevents certain changes to your PC if the source of that change lacks administrator-level permission. In other words, in order to modify the Hosts file you’ll need to grant yourself administrator-level permission.
But we’re not going to mess around with the UAC settings – just leave them be. We’ll grant ourselves temporary permission.
To modify the Hosts file we’ll use Notepad. Right-click on Notepad and from the pop up menu select Run as administrator. It is now running with the necessary administrator-level permission.
Click on File > Open. Navigate to C:\Windows\System32\Drivers\etc and select the hosts file. Make sure the All Files option is active otherwise the hosts file may be hidden. See the screen shot below.

At the bottom of that file add the following …
127.0.0.1       yoursite.dev
Save and close the file. We’re now done with it.
Your hosts file now should look something like this …
# Copyright (c) 1993-2006 Microsoft Corp.
#
# This is a sample HOSTS file used by Microsoft TCP/IP for Windows.
#
# This file contains the mappings of IP addresses to host names. Each
# entry should be kept on an individual line. The IP address should
# be placed in the first column followed by the corresponding host name.
# The IP address and the host name should be separated by at least one
# space.
#
# Additionally, comments (such as these) may be inserted on individual
# lines or following the machine name denoted by a '#' symbol.
#
# For example:
#
#      102.54.94.97     rhino.acme.com          # source server
#       38.25.63.10     x.acme.com              # x client host

# localhost name resolution is handle within DNS itself.
#       127.0.0.1       localhost
#       ::1             localhost
        127.0.0.1       yoursite.dev
This of course assumes you have a folder named yoursite.dev within XAMPP’s htdocs folder.
Now when you point your browser to http://yoursite.dev your PC will look for that site on your computer and not the internet because we have mapped it to 127.0.0.1. Cool, yes?
Add as many entries as needed. Here is an example of a few of mine …
 127.0.0.1  wpcanada.dev
 127.0.0.1  wpcanada2.dev
 127.0.0.1  wpcanada3.dev
 127.0.0.1  wordpress.dev
 127.0.0.1  wordpress2.dev
 127.0.0.1  wordpress3.dev
Okay, now that we’ve instructed our PC to look for these sites internally we have to tell the Apache webserver included with XAMPP how to handle these requests. We do so by utilizing Apache’s virtual hosts feature.

Virtual Hosts

By using the Apache’s virtual hosts feature we can create as many local sites as we want and have them served with our custom domains.
Navigate to C:\xampp\apache\conf\extra and look for the file named httpd-vhosts.conf Open httpd-vhosts.conf in a plain text editor such as Notepad or Notepad++ etc and at the end of the file add the following …
<VirtualHost *>
 DocumentRoot "C:\xampp\htdocs"
 ServerName localhost
</VirtualHost>
The above is important so that we don’t lose access to the htdocs folder. Now we’re ready to start adding our virtual hosts.
Again, assuming our dev site is located at http://yoursite.dev add the following to the httpd-vhosts.conffile. (it will go directly beneath the bit I posted above)
<VirtualHost *>
 DocumentRoot "C:\xampp\htdocs\yoursite.dev"
 ServerName yoursite.dev
 <Directory "C:\xampp\htdocs\yoursite.dev">
 Order allow,deny
 Allow from all
 </Directory>
</VirtualHost>
The end of that file should now look like this …
<VirtualHost *>
 DocumentRoot "C:\xampp\htdocs"
 ServerName localhost
</VirtualHost>
<VirtualHost *>
 DocumentRoot "C:\xampp\htdocs\yoursite.dev"
 ServerName yoursite.dev
 <Directory "C:\xampp\htdocs\yoursite.dev">
 Order allow,deny
 Allow from all
 </Directory>
</VirtualHost>
Any additional sites you want to include would be added underneath. Let’s say you have 3 local sites you want to create virtual hosts for. This is what the end of the file would look like …
<VirtualHost *>
 DocumentRoot "C:\xampp\htdocs"
 ServerName localhost
</VirtualHost>
<VirtualHost *>
 DocumentRoot "C:\xampp\htdocs\yoursite.dev"
 ServerName yoursite.dev
 <Directory "C:\xampp\htdocs\yoursite.dev">
 Order allow,deny
 Allow from all
 </Directory>
</VirtualHost>
<VirtualHost *>
 DocumentRoot "C:\xampp\htdocs\yoursite2.dev"
 ServerName yoursite2.dev
 <Directory "C:\xampp\htdocs\yoursite2.dev">
 Order allow,deny
 Allow from all
 </Directory>
</VirtualHost>
<VirtualHost *>
 DocumentRoot "C:\xampp\htdocs\yoursite3.dev"
 ServerName yoursite3.dev
 <Directory "C:\xampp\htdocs\yoursite3.dev">
 Order allow,deny
 Allow from all
 </Directory>
</VirtualHost>
You get the idea. Just keep adding them by following the above format.
When you’re done save the httpd-vhosts.conf file and close it. If Apache is running you will need to stop and restart it for the changes to take effect.
Now fire up XAMPP and visit your local dev site with its shiny new custom URL.
Install WordPress and XAMPP On Your PC
In this tutorial I’ll show you how to install WordPress on your desktop PC using XAMPP. At the time of this writing the current version of XAMPP.
There are two ways to install XAMPP:
  • using the ZIP file
  • using the installer
What’s the difference you ask? If you use the installer method XAMPP will automatically install the necessary services needed to run. This method also comes with an uninstaller should you decide you no longer want the program.
Using the ZIP method doesn’t actually install anything. You simply extract the contents of the ZIP file to C:\and manually start the services. When you no longer want the program there is nothing to uninstall, there are no added or modified registry entries. You simply delete the XAMPP directory which is located at C:\xampp This is my preferred method but I’ll walk you through the process of setting up XAMPP using both methods.
Setting up WordPress on your PC is a great idea for several reasons:
  • maintain a backup or clone of your live blog
  • test new functionality such as plugins, themes etc without affecting your live blog
  • general experimentation
I have dozens of WordPress instances running on my PC including several SVN installs.
In order to run, WordPress requires a server (Apache), and that server needs to support both PHP and MySQL. XAMPP will set these components up for you.
Ready? Then let’s go!

Using the ZIP method

Head over to the Apache Friends website to obtain XAMPP. See the image below.

We are using the ZIP method so make sure to click the green graphic that says Download Click here for other versions. Don’t click the graphic to download the installer, we’ll go through that later.
After clicking the green graphic that says Download Click here for other versions you’ll see the the image below.
Looking at the image above click on More Downloads.
After clicking on More Downloads you’ll see the image below.

Looking at the image above click the first item XAMPP Windows.
After clicking XAMPP Windows you’ll see the following screen. Click the first item 1.8.3.

After that you’ll see the following image with a list of available packages.
XAMPP packages
Looking at the image above take the item labelled xampp-win32-1.8.3-3-VC11.zip. It should be the 2nd item in the list. You could also take the 7z package (3rd item in the list) but for purposes of this tutorial we’re using the ZIP.
Download the ZIP somewhere to your hard drive and extract the contents to C:\ Do not extract it to C:\Program Files or some such thing. It must be extracted to the root of the drive which is C:\
Extracted properly the directory should be C:\xampp

Using the Installer

Head over to the Apache Friends website to obtain XAMPP. See the image below.

This time we want to download the installer, we don’t want the ZIP. Looking at the image above click the graphic labelled XAMPP for Windows. After a few seconds the download will begin. Again, save it somewhere to your hard drive.
When the download is complete double click it to start the installation. You’ll see the image below. Click Next.

After clicking Next you may see the next screen. It’s a warning that your antivirus may interfere with the installation process.

At this point you can temporarily halt the installation in order to shutdown your antivirus for a few moments or simply continue. I opted to shutdown the AV for a few minutes.
Next, you’ll see the image below.

Looking at the image above, it is asking what components you want to install. All you need is Apache, MySQL, PHP and phpMyAdmin. After selecting the components click Next.
Now we come to the screen below.

Looking at the image above, it is asking what directory XAMPP should be installed in. It should default to C:\xampp but if it doesn’t for some reason make sure to manually select C:\xampp As I stated earlier, XAMPP must be installed at the drive’s root. In fact you may see a screen warning you about User Account Control (UAC) protection and reminding you to install the package at root.
After clicking Next we come to the screen below.

Bitnami is an open source project that provides installers and virtual appliances for various web packages. For the purposes of this tutorial we won’t be using it so clear the check box labelled Learn more about Bitnami for XAMPP. Click Next.
After clicking Next we come to the Welcome to XAMPP installation screen below.

Be patient while the installation is underway. It takes only a few moments. Once complete you’ll see the screen below.

Looking at the image above clear the check box that says Do you want to start the Control Panel now? Click Finish.
And we’re done. XAMPP is now installed. The reason why I said to clear the check box and not to start the Control Panel is because I will show you how to start it each time you want to use it.
Now that XAMPP is installed let’s start using it.

Using XAMPP

If you set up XAMPP using the ZIP method you’ll need to navigate to C:\xampp\xampp-control.exe to access the Control Panel. You may want to add this shortcut to your Start Menu or Desktop or Taskbar etc for convenience in the future.
If you set up XAMPP using the installer it will have added the shortcut for the Control Panel to your Start Menu.
You’ll need to start the Control Panel with administrative rights so right click xampp-control.exe and select Run as administrator. See the image below.

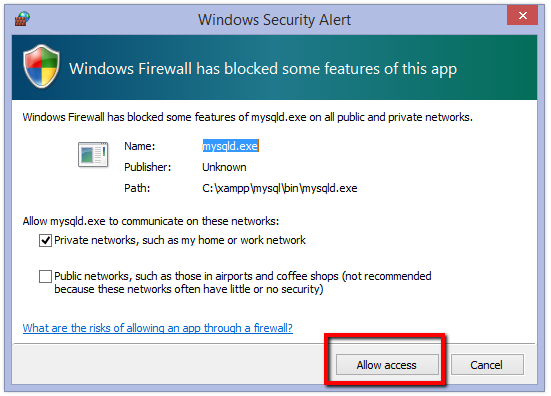
After that Windows firewall will throw up 2 warnings at you. One informing you that some features of the Apache HTTP Server have been blocked and the other informing you that some features of mysqld.exe have been blocked. Grant access to both. You’ll only need to grant access this one time. It will add a permanent rule so that these dialogues won’t bother you in the future. See the images below.


After granting access to both Apache HTTP Server and mysqld.exe you’ll be greeted by the XAMPP Control Panel. See the image below.

Looking at the image above click the appropriate buttons to start both Apache and MySQL. Clicking the red x at the top right corner minimizes the Control Panel to the taskbar while clicking Quit shuts down the Control Panel.
Now that everything is running open your favourite browser and navigate to http://localhost/xampp/ The first time you visit this URL you will see the splash screen below.

Looking at the image above select your language. I chose English.
You will now arrive at the XAMPP backend where you can access its various tools and functions. For instance, you can access phpMyAdmin by clicking its link in the sidebar. You can also reach phpMyAdmin by navigating directly to http://localhost/phpmyadmin/ in your browser.
While in the XAMPP backend you’ll see a link in the sidebar labelled Security. Since this is localhost it’s not necessary to activate any security measures because only you can access it. That’s why you should never install this package on a live, remote server. It’s meant to create a development environment on your PC.
But in case you do want to activate some very basic protection click the link I mentioned labelled Security. See the image below.

After clicking that link you’ll see the following screen. See the image below.

Looking at the image above you can see a list of unsecure items. Click the link http://localhost/security/xamppsecurity.php to correct that.
After clicking that link you’ll be taken to the XAMPP Security Console where you can activate some basic security measures. See the image below.

Looking at the image above you can set a password for the MySQL SuperUser. The default username is root. Make sure to retain this password because you will need it not only to access phpMyAdmin in the future but to install WordPress later on. You can also set a username and password to protect the XAMPP directory.
After completing those steps you need to shutdown then restart both Apache and MySQL in order for the changes to take effect. Maximize the Control Panel (if minimized) and click the buttons labelled Stop for both Apache and MySQL. See the image below.

Looking at the image above you don’t need to click the button labelled Quit. You only click that when your session is over and you want to close everything. Our session is not over as we’re restarting Apache and MySQL.
Once both services are stopped, wait a few seconds then start them again.
That’s it. We have installed XAMPP which includes everything we need to run WordPress on our PC. In this part we’ll go through the process of installing WordPress.
First, we need to download WordPress. Head over to http://wordpress.org/download/ to grab a copy and save it to your hard drive.
When working with XAMPP all of your web projects will be stored in the htdocs folder located at C:\xampp\htdocs. Your WordPress project(s) will go there as well as any other projects you care to create such as Drupal, SMF, Joomla! etc. You access the projects with a browser by navigating to http://localhost/YourProject
For example, put your WordPress folder in the htdocs folder so that the path looks like C:\xampp\htdocs\WordPress You can name the WordPress folder anything you want – it doesn’t have to be WordPress. In fact you’ll have to if you want to run more than one instance. My various WordPress folders are named as such wp01, wp02, wp03 and so forth.
If you go with WordPress then the path would be C:\xampp\htdocs\WordPress and the URL http://localhost/WordPress
If you named the WordPress folder wp01 then the path would be C:\xampp\htdocs\wp01 and the URL to access it http://localhost/wp01. You get the idea.
Okay, go to the WordPress ZIP file you downloaded moments ago and extract the contents to C:\xampp\htdocs. (minus the period) Your project will be located at C:\xampp\htdocs\wordpress and to access it with your browser you will navigate to http://localhost/wordpress
Next, fire up the XAMPP Control Panel and with your browser navigate to http://localhost/phpmyadmin/ for it is here that we will create a database for WordPress. If you created a password for the MySQL SuperUser as outlined in Part 1 you will need to enter that password at the phpMyAdmin login screen. The default username is root.
If you didn’t create a password you’ll enter the phpMyAdmin backend right away bypassing the login screen.
Once in the phpMyAdmin backend you will see the screen below.

Looking at the image above click Databases. You will then be presented with the screen below.

Looking at the image above choose a name for your new database – I chose wordpress. From the drop menu select a collation – I chose utf8_general_ci then click Create.
Success! You have just created a brand new database for WordPress. You can see it in the list in the sidebar. See the image below.

Now we’re ready to install WordPress.

Install WordPress

With your browser navigate to http://localhost/wordpress where you will see the screen below.

Looking at the image above click on Create a Configuration File. After that you will be presented with the screen below.

Looking at the image above, it is reminding you it will need some basic information to continue the installation. Click on Let’s Go!
At the next screen, as seen below, you will enter the basic information WordPress wants.

Looking at the image above it is asking for:
  • Database Name
  • User Name
  • Password
  • Database Host
  • Table Prefix
These are the details you will enter:
  • Database Name: wordpress (as chosen earlier)
  • User Name: root (the default MySQL SuperUser)
  • Password: the password you chose earlier for the MySQL SuperUser
  • Database Host: localhost (default)
  • Table Prefix: wp_ (default)
After entering the details click on Submit.
You will then see the screen below. Click on Run the install.

Now we come to the next screen where it asks for the details specific to this WordPress install. See the image below.

Looking at the image above enter your:
  • Site Title – I chose My Site
  • Username – I chose username
  • Password – I chose password (hence the weak password warning :) )
  • Your E-mail
Click on Install WordPress.
The installation literally takes a few seconds. You should then see a confirmation screen like the one below. Click on Log In.

You will finally be presented with the WordPress login screen as seen below.

Enter the Username and Password you chose a few moments ago and Bob’s your uncle! Congratulations, you now have a fully functioning WordPress site on your PC. Have fun!
Further reading:
  • Apache Friends XAMPP forum (English) [link]
  • Apache Friends XAMPP FAQs (Windows) [link]
  • WordPress Codex [link]
  • WordPress Support Forums [link]